

Trophy Buck Quilt Along—Week 3
Posted by Christine Hobbs on

So glad to see you’re still with me!
If you were able to complete templates 1 through 22 last week, you rock! Even if you weren't able to get through all of those, you still rock! It's understandable that things don't always go as planned—especially now, during these crazy times. Just get back at them whenever you can find time.
This week your buck is going to start coming to life! We’re going to wrap up templates 23 through 27 and then assemble Panel 1.
When you're assembling the panel, don't forget that it is a mirror image of the finished top. In other words, while it looks like we're making the lower left panel of the quilt top, it will flip over and be the lower right panel.
Pattern Assembly Overview
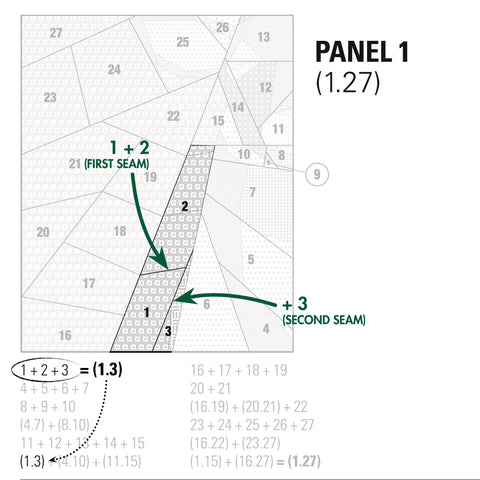
Ideally, if you have the space or a design wall, you will arrange your completed templates as shown in the Panel 1 diagram from the pattern.
In the pattern, the first set of numbers below the diagram, 1 + 2 + 3, indicates the sewing order. This creates unit (1.3) which gets set aside for later.
The next set of numbers, 4 + 5 + 6 + 7 will create unit (4.7) which also gets set aside to join with unit (8.10). And, so on and so on....
Sewing Templates Together
With right sides together, place a straight pin through the top template on the far left point of the seam you're planning to sew.

Being careful to hit the corresponding corner on the bottom template, insert the pin through the back template. If you're like me, this may take two or three attempts.
With all those stabs, it's a good thing I'm not a nurse, huh?

Next, I slide the pin to the head and wiggle it around to straighten out the pin and align the fabric.

Without securing the pin, I move to the right end of the seam and repeat the process. Once both pins are in place, I carefully align the top edges of the stacked templates.

Next, being careful not to shift the fabric, I use pins along the top edge of the seam as necessary to reduce shifting. Once I have the rest of the seam secured I go back to the corner pins and secure them...again, being careful not to shift the fabric!
After sewing together template pieces, ensure that they are properly aligned. If you're satisfied with how they line up, remove the seam allowance paper on both templates, and press using a dry iron.
The Devil Is in the Details
Once in a while, you'll have a place in the middle of a seam where there is a critical alignment. An example on this panel would be when joining units (1.10) and (11.15).

For these seams, place a pin at the critical juncture the same way you pin a corner to ensure that they align. Pin the rest of the seam as usual but baste the critical intersection first. If you're satisfied with the basted alignment, you can then finish stitching the entire seam and press.
Pressing
I don't have a strict rule on pressing the seams. I usually just go to the path of least resistance. If there are a bunch of seams than run crosswise to the seam, I press away from them.

That's a ton to absorb so that's all for this week. Happy quilting and can't wait to see your progress!
Weekly Challenge
Share a photo of your progress—hopefully the full Panel 1, but progress is progress!—with the hashtag #trophybuckquiltalong.
Share this post
- 0 comment
- Tags: #hobbstrophybuck, #trophybuckqal, buck, deer, foundation paper piecing, FPP, paper pieced, QAL, quilt, quilt along, trophybuckquiltalong