

inspire.design.create — FPP
Trophy Buck Quilt Along—Week 5
Posted by Christine Hobbs on

Can you believe October is here already? I’m not one of those count down people, but I am amazed at how quickly the holidays are coming up. Yikes!
If you're making your Trophy Buck as a holiday gift, it's definitely time to buckle down and stay on track. But, don't forget, there's a catch up week (Week 8) coming soon if you need it! And, if you don't need the extra time, you can start planning your next project. Because you can never have too many projects going at once—am I right?!
This week, we're working on Panel 2 templates 50 through 54 and Panel 2 assembly. If you have slipped a bit behind, the full schedule is below and weeks 1 through 4 link to the corresponding blog posts. You got this! Just take it one piece at a time.
Review to Date
WEEK 1–Gather Materials and Prep Pattern
WEEK 2–Panel 1 Templates
WEEK 3–Panel 1 Templates and Assembly
WEEK 4–Panel 2 Templates
WEEK 5–Panel 2 Templates and Assembly
WEEK 6–Panel 3 Templates
WEEK 7–Panel 3 Templates and Assembly
WEEK 8–Catch Up or Take a Break!
WEEK 9–Panel 4 Templates
WEEK 10–Panel 4 Templates and Assembly
WEEK 11–Sew Top
Sneak Peek

I know it doesn't look like much right now, but I've started working on a small companion piece to the Trophy Buck. Stay tuned for details! Any guesses on what it might be?
Weekly Challenge
Let us know the lucky recipient of your Trophy Buck (if it's not a secret!) by sharing his/her name and a progress shot with the official hashtag #trophybuckquiltalong.

No relevance to anything, but I just had to share this photo. I had my two panels on my ironing board before I hung them on the design wall when they shifted like this. I was leaning toward naming my buck Kingston, but may have to reconsider Picasso!
- 0 comment
- Tags: #hobbstrophybuck, #trophybuckqal, buck, deer, foundation paper piecing, FPP, paper pieced, QAL, quilt, quilt along, trophybuckquiltalong
Trophy Buck Quilt Along—Week 4
Posted by Christine Hobbs on
We're Making Progress!

By the end of this week, you'll hopefully have another stack of templates since we're working on Panel 2 templates 28 through 49. If you're fairly new to foundation paper piecing, fingers crossed that you're getting more comfortable with the technique. And, if you're an old hand at it, I'm glad to have your company during these eleven weeks!
Fixing a Mistake
Just when you think everything is going along smoothly, you'll step back and find a piece that's the wrong fabric, a place where you didn't include enough fabric, or in this case missing completely.
There's no need to panic!
Last week, as my buck was hanging on the design wall, I realized I'd overlooked piece 11e. I could probably move on with few the wiser but this is something that would drive me nuts and cause me to lose sleep at night. And, although it can be time consuming, it's not that difficult to fix.
First, I determined the easiest route to reverse engineer to the piece I needed to correct. (That's code for I got my seam ripper out and start removing stitches!) The arrows in the image below show the seams I needed to pick apart to open up enough space to add the missing piece.

I removed seam 1 about an inch past the nose bottom, seam 2 about an inch past the nose side, and seam 3 about an inch past where I needed to sew in the missing piece.

I then folded back the stitching line on piece 11e and positioned the missing fabric as normal.

Unfortunately, when I tried using my Add-A-Quarter ruler and rotary cutter I risked cutting into the rest of my quilt top, so I opted to cut the 1/4" seam with a small pair of scissors.

It was then time to hop over to the sewing machine and stitch the seam. I made certain to stitch at least 1/4" prior to and past my stitching line since my seam allowances had already been removed.

Next, I carefully aligned the seams I'd removed and stitched them back together. This time; however, I reversed the unpicking order by sewing the seam at the top of the nose, then the side of the nose, and then the bottom of the nose. At this point, I trimmed the excess fabric from the piece.

I wrapped it up with a good pressing and voila! No one will be the wiser and I'll be able to sleep like a baby!

The notes above are specific to my missing piece, but they should give you a bit of guidance to get back on track if you find that you need to fix a mistake. Good luck!
What Others Are Working On
I've seem some progress posts on social media and am crushing on the variety of fabrics being used! Unique color combinations and fantastic backgrounds are the current theme.
Teara from Lazy J Quilting (lazy_j_quilting) found this amazing fabric that looks like starlight. So cool!

Photo courtesy of Lazy J Quilting
Now that you’ve spent some time getting to know your VIP (or would that be VIQ...Very Important Quilt?), have you named him? To be honest, I still haven't decided on a name.
Weekly Challenge
Let everyone know what you’ve dubbed your buck by sharing a progress pick using the hashtag #trophybuckquiltalong.
- 1 comment
- Tags: #hobbstrophybuck, #trophybuckqal, buck, deer, foundation paper piecing, FPP, paper pieced, QAL, quilt, quilt along, trophybuckquiltalong
Trophy Buck Quilt Along—Week 3
Posted by Christine Hobbs on

So glad to see you’re still with me!
If you were able to complete templates 1 through 22 last week, you rock! Even if you weren't able to get through all of those, you still rock! It's understandable that things don't always go as planned—especially now, during these crazy times. Just get back at them whenever you can find time.
This week your buck is going to start coming to life! We’re going to wrap up templates 23 through 27 and then assemble Panel 1.
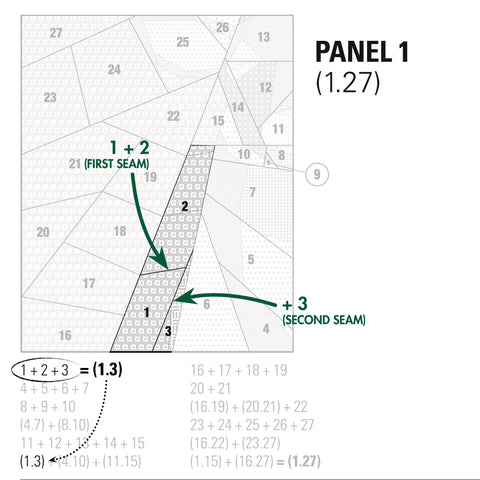
When you're assembling the panel, don't forget that it is a mirror image of the finished top. In other words, while it looks like we're making the lower left panel of the quilt top, it will flip over and be the lower right panel.
Pattern Assembly Overview
Ideally, if you have the space or a design wall, you will arrange your completed templates as shown in the Panel 1 diagram from the pattern.
In the pattern, the first set of numbers below the diagram, 1 + 2 + 3, indicates the sewing order. This creates unit (1.3) which gets set aside for later.
The next set of numbers, 4 + 5 + 6 + 7 will create unit (4.7) which also gets set aside to join with unit (8.10). And, so on and so on....
Sewing Templates Together
With right sides together, place a straight pin through the top template on the far left point of the seam you're planning to sew.

Being careful to hit the corresponding corner on the bottom template, insert the pin through the back template. If you're like me, this may take two or three attempts.
With all those stabs, it's a good thing I'm not a nurse, huh?

Next, I slide the pin to the head and wiggle it around to straighten out the pin and align the fabric.

Without securing the pin, I move to the right end of the seam and repeat the process. Once both pins are in place, I carefully align the top edges of the stacked templates.

Next, being careful not to shift the fabric, I use pins along the top edge of the seam as necessary to reduce shifting. Once I have the rest of the seam secured I go back to the corner pins and secure them...again, being careful not to shift the fabric!
After sewing together template pieces, ensure that they are properly aligned. If you're satisfied with how they line up, remove the seam allowance paper on both templates, and press using a dry iron.
The Devil Is in the Details
Once in a while, you'll have a place in the middle of a seam where there is a critical alignment. An example on this panel would be when joining units (1.10) and (11.15).

For these seams, place a pin at the critical juncture the same way you pin a corner to ensure that they align. Pin the rest of the seam as usual but baste the critical intersection first. If you're satisfied with the basted alignment, you can then finish stitching the entire seam and press.
Pressing
I don't have a strict rule on pressing the seams. I usually just go to the path of least resistance. If there are a bunch of seams than run crosswise to the seam, I press away from them.

That's a ton to absorb so that's all for this week. Happy quilting and can't wait to see your progress!
Weekly Challenge
Share a photo of your progress—hopefully the full Panel 1, but progress is progress!—with the hashtag #trophybuckquiltalong.
- 0 comment
- Tags: #hobbstrophybuck, #trophybuckqal, buck, deer, foundation paper piecing, FPP, paper pieced, QAL, quilt, quilt along, trophybuckquiltalong
Trophy Buck Quilt Along—Week 2
Posted by Christine Hobbs on

Time to dig in!
This week we’re going to set the goal to sew the majority of the templates from Panel 1 (templates 1 through 22). For some of you, this pace will be tedious and for others it will be grueling. Some of you will be able to work on it in large chunks of time and others will only be able to do a couple of pieces a day.
Bottom line—go at the speed that works best for you!
If you’ve found your mojo for the day, go ahead and work on a few more pieces. And, if you haven’t done a lot of paper piecing, remember that you’ll get faster with more experience.
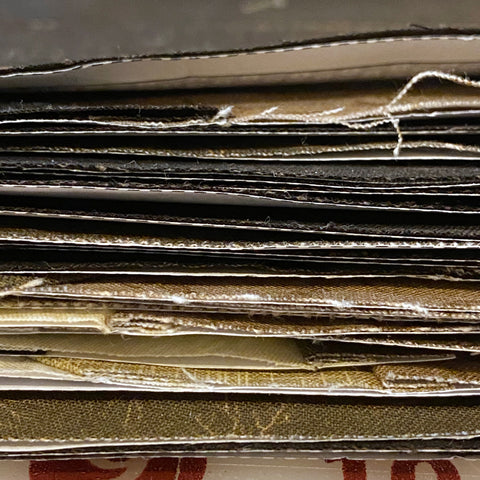
If you look closely at the this first set of templates, there are 13 with multiple pieces and the rest are just one piece of fabric. Until you get into a groove, you may want to dig through the stack of templates and start with the ones that only have two or three pieces.
You absolutely, definitely, 100% DO NOT have to work on the templates in order!
Where I Create

If your space allows, try to set it up in the most efficient layout that works for your personal style. My space is set up similar to a kitchen work triangle. The cutting area (shown above, and, yes it was clean when I started!) is opposite the ironing station and my sewing machine has easy access to both of these zones. I know some quilters set up an iron and cutting mat near their sewing machine and if that works for you, that's great. I intentionally don’t have those at my fingertips because some days getting up to cut and iron is the only exercise I get!
Tips to Get Started
- The most important tip I can share is to use a generous amount of fabric and make certain it extends far enough to cover the seam allowances on all sides. There's nothing worse than flipping the template over and seeing a gap in the fabric!
- Use an open-front presser foot which allows you to clearly see your stitching and set your stitch length to 14 to 18 stitches per inch. On my machine the 1.6 setting seems to work best. It's short enough to create a tight seam yet long enough that the foundation paper doesn't fall out with minimal handling.
- For large single piece templates, baste the fabric to the foundation paper along the length. It may sound weird, but I like to align these as normal and then flip them over to sew so the paper is on the bottom. By sewing them this way, it reduces puckering and gathering for me. (And, if you'd rather not baste at all, you can dab some water soluble fabric glue between the two layers).
- If you’re having difficulty catching the fabric on the feed dogs as you slide it in place to stitch, slip a scrap of paper under the unit being sewn before sliding it under the needle. You can then tear away the scrap paper after stitching.
- Additional tips can be found on the Basic Paper Piecing Instructions tutorial.
There's no day like today, so roll up your sleeves and get sewing. In the blink of an eye, you'll have the week one templates stacked and/or ready for the design wall!

Weekly Challenge
Share your favorite foundation paper piecing tip with the official hashtag #trophybuckquiltalong.
See you back here next Monday!
- 1 comment
- Tags: #hobbstrophybuck, #trophybuckqal, buck, deer, foundation paper piecing, FPP, paper pieced, QAL, quilt, quilt along, trophybuckquiltalong
Trophy Buck Quilt Along 2020
Posted by Christine Hobbs on


Sign up to join the fun!
Join us September 7, 2020, for an 11-week quilt along where we'll make our newest pattern, Trophy Buck.
The plan is weekly blog posts to help you break down this big boy down from 112 templates into a manageable project that wraps up by Thanksgiving...and, hopefully have some fun along the way!
So, sign up for the newsletter to get post reminders, grab your copy of the pattern (PDF download or printed pattern), and find some fabrics that sing to you.
And, before I forget, we're going to be pairing up with some great quilters from the Longarm League, so stay tuned for those details.
Fabric requirements—


Check out that ombre sky! If you're wanting to push the envelope a bit, Jenn R. created bold color version above using these fabrics.
White—Kona White
Natural—Kona Natural
Putty—Kona Ice Peach
Tan—Kona Canteloupe
Parchment—Kona Mango
Cobblestone—Kona Carrot
Herb—Kona Nectarine
Bison—Kona Paprika
Graphite—Kona Graphite
Black—Kona Black
Basil—This was custom split between Guicy Guice Spectrastic Moss, Benartex Caryl Bryer Fallert Essentials Style 2046, Kona Royal
Purchase the pattern
Subscribe to this blog's RSS feed using:
https://urbanloonstudios.com/blogs/inspire-design-create.atom- 0 comment
- Tags: #hobbstrophybuck, #trophybuckqal, buck, deer, foundation paper piecing, FPP, paper pieced, QAL, quilt, quilt along